Table of Contents
Everyone has to bat in cricket but not all players will get to bowl. However, all youngsters learning the game should be fully conversant with the art.
In this guide I’ll talk you through some basic coaching advice on how to bowl and we’ll also take a look at some common techniques.
The Basics of Bowling Actions in Cricket
Whether you’re a spinner or a pace merchant, it’s vital that you get the basics right when it comes to bowling a cricket ball. The same principles apply whether you are right handed or left handed and there are steps to follow that will assist you in sending down those perfect deliveries.

The natural stages of a bowling action will also guard against throwing the ball – also referred to as ‘chucking’. This is an illegal delivery and something that we need to avoid.
This is very much a guide for beginners – young players and anyone looking to take up the game at any age. Here are the basics that we will work through.
- Grip
- Run Up
- Jump and Gather
- Delivery Stride
- Release Point
- Follow Through

How to Bowl Correctly: A Beginner’s Guide
Step 1: How to Hold a Cricket Ball
The grip is where it all begins: The ball isn’t a perfect sphere and the fact that it has a seam means that it is essential that you hold it correctly.
At a beginner’s level, we can simplify this by putting bowlers into two categories.
How to Grip the Ball for Fast Bowling
- Place your middle and index fingers on the top of the ball with that seam running vertically in the centre.
- The ring finger and little finger will be alongside while the thumb will be underneath, and each of these will provide support.
- Do not press the ball too far back into the palm of your hand as you need it to be fairly relaxed.
How to Grip the Ball for Spin Bowling
- For spin bowlers, the basic grip will be similar but there are two clear differences. The seam of the ball should run across the fingers rather than be parallel to them.
- The middle and index fingers will also be wider apart.
- The supporting fingers and thumb will be in a similar supporting position to the faster bowler.
There are more complicated grips for seamers, wrist spinners and those who are looking to swing the ball but I’m talking about the basics for now.
Step 2: How to Run Up to the Crease
The purpose of the run up is to build up some momentum as we approach the crease. Faster bowlers will have a long run up to help them gather speed while spinners will come in from just a few paces.
- To start with, use a smaller run up around five paces is widely recommended and you can begin with a light jog.
- When you become more confident, it will be easier to extend that run up if you want to but you’ll need to master the smaller run first.
- Just jog in to the crease until that run starts to feel comfortable, and you have the momentum needed.
Those players starting out don’t even have to worry about letting go of the ball. Once you’re happy and the art of running in becomes a natural thing, we can move on to the more technical elements of a bowling action.
Step 3: How to Jump and Gather
- Think of the jump and gather as a spring. You’re coiling and therefore gaining the momentum that puts extra pace onto the ball as it’s delivered.
- As a right arm bowler, you will be jumping from your left foot to your right as you approach the crease – you’ll usually be around two paces away.
- As your right foot lands, bring your left knee up, slightly towards your chest, while leaning back slightly. This is the jump and gather. For left arm bowlers, simply reverse the feet.
To begin with, you can practise this from a few paces, independently from the run up phase. It is a little technical but if you follow those steps then the jump and gather will also start to feel natural.
Step 4: The Delivery Stride
The delivery stride is the stride the bowler makes once the jump and gather has been completed. You should be one full stride away from the crease and the delivery point. The stage that fills this gap is known as the delivery stride.
As and when you are comfortable with stages one through to three, the delivery stride should be easy to master. It’s a full, stretched stride into the crease and, as your front foot lands, it’s time to send that ball down to the batsman’s end.
Step 5: How to Release the Ball
- As that front foot plants down on the popping crease, pull your bowling arm down at speed.
- The arm will rotate downwards but the optimum point at which the ball should be released is just after the hand reaches its highest point – i.e., as it begins its downward trajectory.
- Keep the arm straight to ensure that this is a legal delivery and to avoid chucking.
- The faster the arm, the quicker the ball, so pace bowlers and spinners will adjust their speeds accordingly.
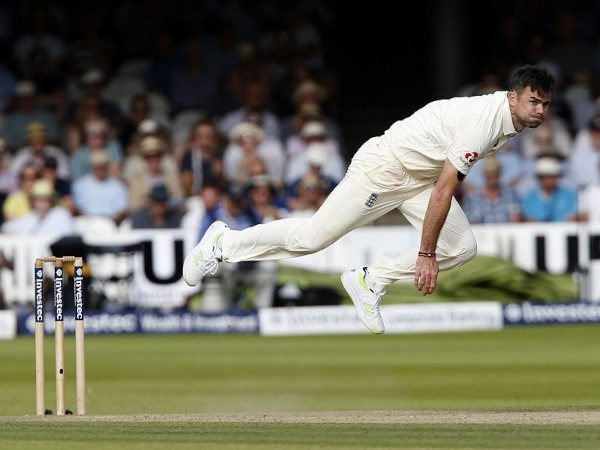
Step 6: How to Follow Through
A follow through adds extra momentum to the delivery and it prevents additional stress on the body. Having delivered the ball, simply run for three or four extra paces towards the batsman.
Remember to avoid the centre of the pitch as this is the protected area so you should run away from it at a slight angle.
Cricket Bowling FAQ
How to Improve a Bowling Run Up?
Start from a few paces and then improve by extending that length. Begin with a gentle jog and increase the speed. Once perfected, you can start to trial other techniques such as coming in at an angle. This process of trial and error will gradually improve your run up until you find one that suits you.
How to Stop Bowling Wides?
Everyone will bowl the occasional wide but how do you stop if you have a perpetual problem?
- Identify your run up as a possible issue.
- If you are delivering the ball from wide of the stumps then try to go closer to them.
- Keep your head up and your arm straight.
- Practice in the nets by putting a handkerchief down on the pitch, on a good length, in line with the middle stump.
- Keep bowling at it until you hit it with greater regularity.
- This will help you keep focus and avoid wide deliveries.
Closing Thoughts
It’s confession time for me: Throughout my club cricket career I’ve always bowled off the back foot. Although it’s been effective at times, it’s not a bowling technique that I, or the coaching manuals, would recommend.
The bowling action is a complex set of phases that aren’t entirely natural to the human body but, when they are broken down into these six stages, they should become simple to follow and manage.
The next step is to understand the direction and length you want to pitch the ball.